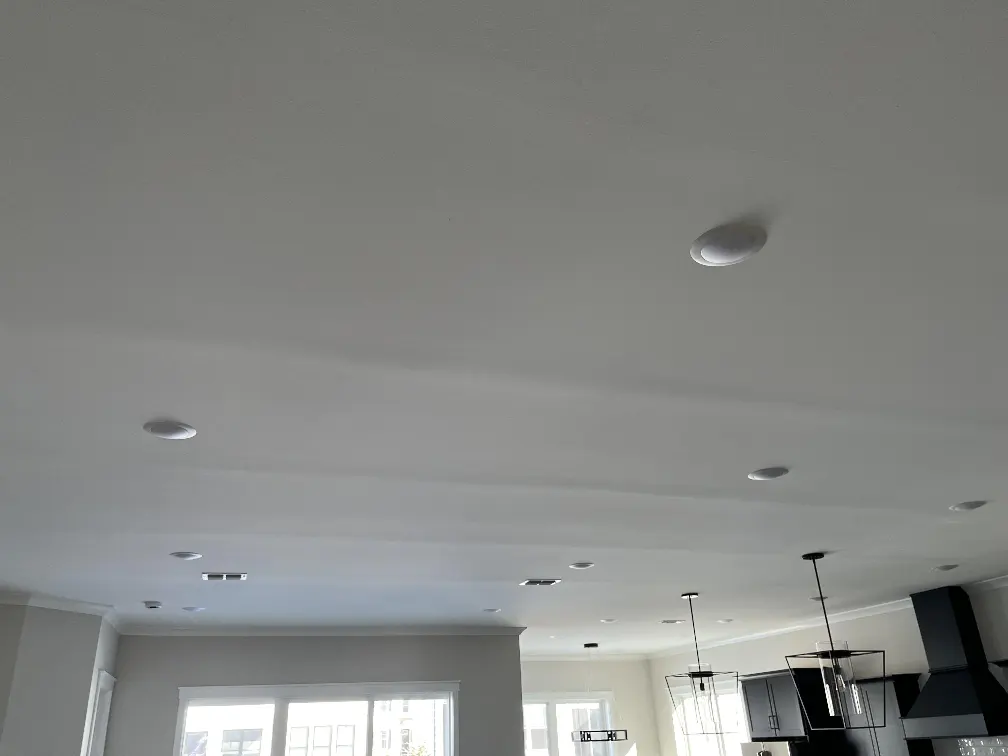
Repairing a bumpy drywall ceiling starts with figuring out what is causing the uneven surface. Small round bumps may be screw or nail pops, long ridges can come from poorly finished drywall joints, and broad humps may be caused by framing or installation problems. Sagging or swollen areas can indicate moisture damage and require a different repair entirely.
The important point is that not every bumpy drywall ceiling should be fixed by simply adding more joint compound.
If you identify the cause first, many cosmetic imperfections can be repaired by a capable DIY homeowner. But ceilings that are sagging, wet, structurally uneven, or repeatedly cracking deserve closer inspection before cosmetic work begins.
A drywall ceiling can look bumpy because the drywall, framing, fasteners, joints, joint compound, texture, or previous repairs are no longer creating one visually flat plane.
Some defects are tiny but become surprisingly noticeable when light travels across the ceiling. Others represent an actual change in the position of the drywall.
Common causes include:
Before reaching for a sanding pole or bucket of joint compound, determine which problem you actually have.
The shape and location of a ceiling defect provide useful clues.
| What You See | Possible Cause | Typical Repair |
|---|---|---|
| Small round bumps | Screw or nail pops | Re-secure drywall and refinish |
| Straight row of bumps | screw pops along a joist | re-secure panel reset popped screws |
| Long raised line | Too much mud over seam | Feather out high spot wider |
| Visible ridge at a joint | coating over wet tape before dry | cut out re-tape and coat |
| Broad wave or hump | Too Much Compound Over Seam/ bad framing | Feather Out Seam Wider or fix framing |
| Localized patch-shaped bump | Poor previous repair | Sand/rework and feather patch |
| Soft bulge or sag | Moisture or loose drywall | Find cause before replacing material |
| Random roughness | Texture or poor finishing | Sand, skim coat, or retexture |
These are diagnostic clues rather than guarantees. Inspect the ceiling before deciding on the repair. The pattern often gives it away like raised humps every 4 feet is the drywall seams with too much compound. A single hump can be one bad seam or a warped framing member.
Small circular bumps are often associated with drywall fasteners.
A screw or nail can create a visible raised spot when movement occurs between the drywall and framing. USG has documented raised circular protrusions over drywall screws that resemble nail pops. Framing movement and installation conditions can contribute to fastener-related problems.
Simply covering the bump with more compound may hide it temporarily without correcting movement underneath.
For a lasting repair, the drywall normally needs to be secure before the surface is refinished.
If the bump follows a straight line for several feet, look at the drywall joint.
A finished drywall joint is not perfectly invisible because the tape and compound add material to the surface. The goal of professional finishing is to spread that material over a sufficiently broad area so the transition is difficult to see.
Problems become obvious when:
Aggressively sanding the center of every hump is not automatically the solution. Removing too much compound can expose joint tape or damage drywall face paper.
Often, the better approach is to feather the transition over a wider area.
A ceiling that looks wavy from one side of the room may have a problem deeper than the finish coat.
Possible causes include uneven joists, framing variations, installation over an irregular substrate, or drywall panels that were not installed in a consistent plane.
These defects are particularly noticeable under grazing light, which is light from a window or fixture traveling almost parallel to the ceiling.
If the framing itself creates the hump, adding compound cannot make the high point disappear. A skilled finisher may be able to visually improve a modest variation by floating the surrounding area, but severe irregularities may require correcting the substrate or rebuilding part of the ceiling.
Treat a bulge differently from a normal finishing hump.
A ceiling that has dropped, feels soft, shows staining, or appears swollen may have been affected by moisture or may no longer be securely attached.
Potential sources include:
Do not bury suspected water damage under joint compound.
The source of moisture needs to be identified and corrected first. Severely damaged drywall may need to be removed and replaced. USG's repair guidance for water-damaged areas calls for cutting out the damaged panel section before installing and finishing replacement material.
If a ceiling is significantly sagging, actively wet, or appears at risk of falling, keep people away from the affected area and have it evaluated promptly.
Sometimes the original damage is gone but the repair itself becomes a new problem.
A patch can look smooth when viewed directly underneath yet appear as a large bump when daylight or ceiling lighting hits it from the side.
Common reasons include:
The objective is not merely to make the center of a patch smooth. The repair has to transition gradually into the surrounding ceiling.
Fasteners can produce small localized bumps as framing and drywall move relative to one another. These are commonly recognizable because several may appear along the same framing line.
More mud does not automatically produce a flatter ceiling.
A thick mound directly over a drywall seam creates a ridge. Professional finishing relies on controlled coats and gradual feathering rather than piling compound onto the joint.
Even a properly taped seam can be visible if the transition between the joint and drywall face is too abrupt.
A wider, smoother transition makes the joint less noticeable.
Drywall follows what is behind it. If a joist is crowned, bowed, twisted, or otherwise out of plane, the finished ceiling can reflect that irregularity.
Surface finishing can disguise modest variations. It cannot correct every framing defect.
Panel layout, support, fastener installation, joints, and the relationship between the drywall and framing all influence the final appearance.
USG's installation guidance emphasizes proper panel positioning and fastening practices. Installation errors can therefore become visible after finishing and painting.
Gypsum drywall that has been significantly compromised by water should not be treated as an ordinary cosmetic hump.
First determine where the water came from and whether the material remains sound.
Repeated patches can gradually build up the ceiling surface. A small crack may have been coated several times without addressing movement underneath, leaving a wide raised area.
Some ceilings are intentionally textured, while others have been patched so many times that the texture becomes inconsistent.
If the goal is a smooth ceiling, localized patching may not provide a uniform appearance. A broader skim coat or other finishing approach may be needed.
Start with visual inspection rather than demolition.
1. Look at the ceiling from several angles.Stand at different sides of the room and observe it under natural and artificial light.
2. Identify the shape of the defect.Is it circular, linear, broad, sagging, cracked, or confined to a previous patch?
3. Look for a pattern.Bumps occurring in a straight line can correspond with framing and fastener locations. A long ridge may follow a drywall joint.
4. Check for moisture clues.Look for discoloration, peeling paint, softness, bubbling, or evidence of an active leak.
5. Use a straightedge where practical.A straightedge can help show whether you have a localized high spot, low area, or gradual wave.
6. Consider what is above the ceiling.An attic, bathroom, plumbing line, roof, or another occupied floor may provide clues.
If the problem appears to involve structural movement, substantial sagging, or active moisture, stop treating it as a finishing defect until the underlying cause has been evaluated.
The correct method depends on the diagnosis.
For an ordinary drywall fastener pop where the surrounding drywall remains sound:
Do not overdrive a drywall screw and tear through the face paper. The fastener should secure the panel without damaging the surface.
First determine whether the hump is primarily excess finishing material or whether the drywall/framing underneath is actually high.
For a finishing problem, the repair may involve removing loose material, correcting failed tape where necessary, and applying wider coats of compound to create a gradual transition.
Counterintuitively, a hump is sometimes made less visible by widening the finished area, not by trying to grind the center perfectly flat.
USG advises against sanding compound all the way flush with the panel surface because doing so can expose previously concealed areas, and roughening drywall face paper can become visible after painting.
Skim coating can be effective when the drywall is sound but the finished surface contains widespread minor imperfections.
A typical process includes:
Skim coating requires technique. An entire ceiling can become more uneven if heavy coats are applied without maintaining a consistent plane.
Skim coating is a surface-finishing method, not a universal repair.
Do not rely on a skim coat alone when:
Correct the cause first. Finish the surface second.
This distinction can save homeowners from repairing and repainting the same ceiling more than once.
A homeowner comfortable with drywall finishing may be able to repair a few isolated fastener pops or a small cosmetic imperfection.
Professional repair becomes more valuable as the affected area gets larger or the diagnosis becomes uncertain.
Consider calling a ceiling drywall repair contractor when the ceiling has widespread waves, long seam humps, extensive failed joints, recurring cracks, sagging panels, water damage, difficult texture matching, high ceilings, or a previous repair that remains highly visible.
Large ceiling repairs are also less forgiving than wall repairs. Natural light can expose subtle finishing defects across a wide surface, and working overhead makes maintaining smooth, consistent coats more difficult.
A professional drywall contractor should evaluate why the ceiling is uneven before deciding whether the solution is re-fastening, taping, floating, skim coating, replacing drywall, correcting the substrate, or combining several methods.
Often, yes. Cosmetic seam humps, minor finishing defects, fastener pops, and shallow surface irregularities can frequently be repaired without replacing the entire ceiling. Loose, severely sagging, extensively water-damaged, or badly installed drywall may require partial or complete replacement.
Visible seams can result from poor feathering, excessive joint compound, uneven panels, framing variations, joint failure, or lighting that emphasizes small surface changes. Determine whether the seam itself is high before sanding it aggressively.
Some excess joint compound can be sanded, but sanding has limits. Aggressive sanding may expose tape or damage drywall paper. If a hump is caused by framing or panel position, sanding the finish will not correct the underlying problem.
Yes, when the underlying drywall is secure and the problem is primarily superficial. Repair loose tape, cracks, fastener problems, moisture damage, and unstable areas before skim coating.
Recurring fastener bumps suggest that movement or attachment has not been fully addressed. Covering the spot with fresh compound alone does not necessarily secure the drywall. The panel and fastener condition should be evaluated before refinishing.
Directional or grazing light can cast shadows across tiny changes in the ceiling plane. Recessed lights, lamps, windows, and other light sources can therefore reveal seams and humps that are difficult to see under diffuse lighting.
Many bumps are cosmetic, but a soft, wet, significantly sagging, or rapidly changing ceiling can indicate a more serious problem. Active leaks and unstable ceiling material should be investigated promptly.
The method depends on the cause. A contractor may re-secure drywall, repair tape, replace damaged sections, feather joints more broadly, skim coat the ceiling, correct framing or substrate problems, match texture, and then prime and paint the finished surface.
Successful bumpy ceiling drywall repair is mostly about diagnosis.
A screw pop should not be treated like a seam hump. A seam hump should not be treated like water-damaged drywall. And a framing problem cannot always be solved by adding another coat of mud.
If the drywall is solid and the problem is cosmetic, careful re-fastening, joint repair, feathering, sanding, skim coating, priming, and painting can restore a smooth appearance.
If the ceiling is sagging, wet, extensively uneven, or repeatedly failing after repairs, have the underlying condition evaluated before investing time and money in another cosmetic fix.
For homeowners who would rather have the problem diagnosed and finished professionally, MrWalls Drywall & Painting can inspect the ceiling, identify the likely source of the unevenness, and determine the appropriate drywall repair method before the ceiling is refinished.