MrWalls Drywall & Painting Western Massachusetts
Drywall Corner Bead, Metal, Bull Nose, Vinyl and how to install them for drywall outside corners.
Outside corners are one of the most visible and most vulnerable elements of a finished drywall installation. The corner bead you choose, and how you install and coat it, determines whether those corners look crisp and straight for years or chip, dent, and crack within the first season of occupancy.
Every outside corner in a drywall installation needs a corner bead: a formed strip of material that protects the exposed edges of two drywall panels meeting at a corner, provides a straight and consistent guide edge for finishing compound, and produces the sharp or rounded corner profile that defines the room's finished character. Without corner bead, the exposed drywall edges at outside corners would crumble, chip, and crack within months. With the wrong bead or poorly installed bead, corners look crooked, crack at the nose, or fail at their attachment points within a few years.
MrWalls installs and finishes outside corners throughout the Pioneer Valley on new construction projects, renovation drywall, and repair work where existing corner bead has failed. The choice of bead type, attachment method, and finishing technique varies by application, and understanding the options helps homeowners and contractors make informed decisions before work begins.
Types of Drywall Corner Bead for Outside Corners
The market for outside corner bead has expanded significantly beyond the traditional metal option. Each type has legitimate applications and genuine weaknesses, and the choice should be driven by the specific corner geometry, the expected impact exposure, and the finishing technique being used.
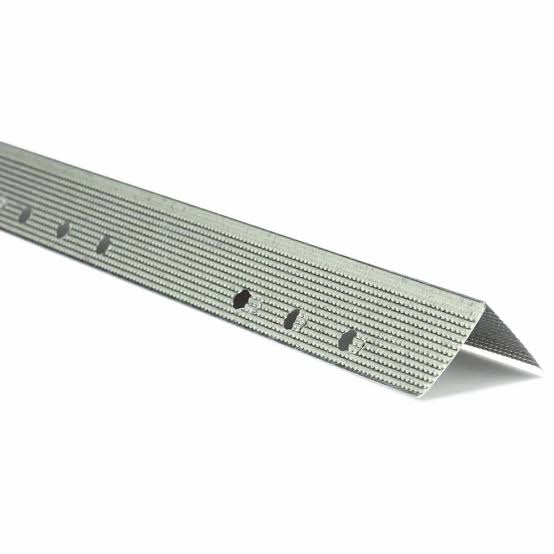
Metal Corner Bead
The traditional standard for outside corners. Galvanized steel or aluminum, with perforated flanges that accept fasteners and allow compound to key through. Produces a very straight, very rigid 90-degree corner that is durable under impact. The nose of the bead acts as a screed guide for finishing compound, making it forgiving for less experienced tapers to achieve a straight corner. Available everywhere, inexpensive, and familiar to every drywall finisher.
Weakness: can rust if moisture reaches the metal through coating holidays. Susceptible to showing through paint if not properly embedded. Requires straight corners to install cleanly.
Vinyl Corner Bead
PVC plastic construction, lightweight, and resistant to rust and corrosion. Better choice than metal in high-humidity environments like bathrooms, laundry rooms, and basements. The plastic flanges are slightly more forgiving than metal on corners that are not perfectly square. Stapled or screwed to framing, or adhered with spray adhesive.
Weakness: less rigid than metal and more susceptible to impact deformation. The nose can dent or crush under less force than steel. Requires primer before compound to ensure adhesion.
No-Coat Corner Bead
A composite system with a hard plastic nose and paper flanges, installed with spray adhesive or staples and embedded in joint compound like tape. The paper flanges key into compound the same way tape does, producing an extremely strong mechanical bond. Very straight, very consistent, and produces excellent corner definition with fewer coats than traditional metal bead. Preferred by many professional finishers for its performance and the speed of achieving a finished corner.
Weakness: more expensive than metal or vinyl. Requires adhesive or careful stapling technique. Less familiar to installers trained on traditional metal bead.
No-Coat Flexible Corner Tape
A paper-faced flexible corner product for corners that are not at standard 90 degrees. The flexible spine allows it to conform to obtuse and acute corner angles that rigid metal or vinyl bead cannot accommodate without kinking or gapping. Installed with compound and embedded like standard joint tape. Essential for bay windows, angled architectural features, and any outside corner that deviates from 90 degrees.
Weakness: less impact-resistant than rigid bead at the nose. Not appropriate for standard 90-degree corners where rigid bead produces a sharper and more durable result.
Bullnose Corner Bead
Produces a rounded outside corner profile rather than a sharp 90-degree nose. The bullnose radius, typically a quarter-inch or three-quarter-inch radius, gives outside corners a softer architectural look that was popular in the 1990s and 2000s and remains a deliberate design choice in some contemporary construction. Available in metal, vinyl, and composite. All other bullnose corners in the same installation must match the radius for visual consistency.
Weakness: purely a design choice with no functional advantage over sharp corner bead. Mixes badly with standard sharp corners in the same space. Harder to touch up if damaged because the radius profile must be maintained.
Archway and Flexible Vinyl Bead
Flexible vinyl bead designed for curved surfaces including archways, barrel vault ceilings, and curved walls. The flanges are slotted to allow the bead to flex around curves without kinking. Available in both standard and bullnose profiles. Essential for any curved outside corner that a rigid bead cannot follow.
Weakness: requires careful installation to avoid visible waves in the finished profile. The slots in the flanges require extra compound to fill before finishing begins.
Metal Corner Bead: Still the Professional Standard for Most Applications
Despite the proliferation of alternatives, galvanized steel metal corner bead remains the most widely used outside corner product in residential construction throughout the Pioneer Valley and across Western Massachusetts. The reasons are straightforward: it is rigid, inexpensive, universally available, and produces a consistently straight and durable corner when correctly installed. Every finisher who learned the trade learned to work with metal corner bead, which means the skill base for installing and coating it is the widest of any corner product.
Metal corner bead is installed by crimping the flanges to the drywall with a corner crimper tool that punches the flanges into the board face, or by fastening with drywall screws through the perforated flange holes. The nose of the bead protrudes approximately a sixteenth of an inch from the finished drywall surface and serves as the depth guide for the first coat of finishing compound. Compound is applied to each flange, feathered away from the nose, and the nose guides the taping knife to a consistent depth on each pass.
MrWalls tip on metal corner bead installation: the straightness of the finished corner is determined almost entirely by the straightness of the bead installation, not by the finishing compound coats. A metal bead installed with even a slight bow or misalignment will produce a corner that looks crooked after painting regardless of how carefully it is finished. Before fastening metal bead permanently, hold it in position and sight down its length from both ends. Any deviation from straight is visible at this stage and correctable. After fastening, it is not. Take the extra sixty seconds to verify the bead is true before driving any crimps or screws.
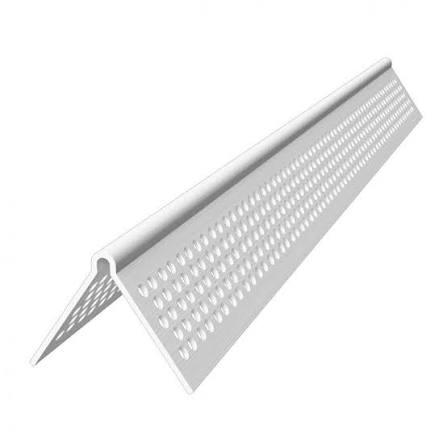
Vinyl Corner Bead: When Plastic Outperforms Metal
Vinyl corner bead is the correct choice in moisture-exposed applications where galvanized metal bead carries a corrosion risk. Bathrooms, laundry rooms, mudrooms, and basement finishing projects in Western Massachusetts's older housing stock frequently present moisture conditions that can compromise metal bead over time. Galvanized coating is durable but not impervious, and if moisture penetrates through a holiday in the compound coating and reaches the bare metal at a cut end or fastener hole, rust can develop and telegraph through the finished wall surface as a brownish stain.
Vinyl bead eliminates that failure mode entirely. It installs the same way as metal bead and finishes the same way. The tradeoff is slightly less rigidity at the nose, which makes vinyl more susceptible to denting under direct impact than steel. In applications where both moisture resistance and impact resistance are priorities, the No-Coat composite system with its hard plastic nose and paper flanges is a stronger choice than standard vinyl bead.
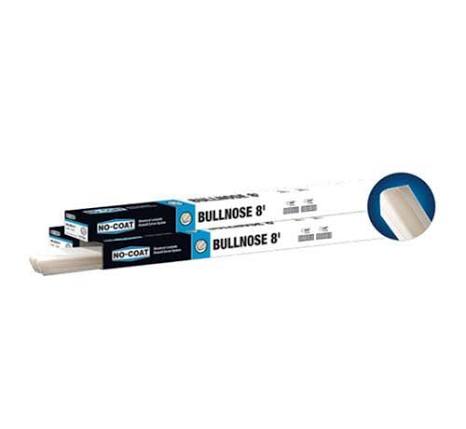
No-Coat Corner Bead: Why Many Professional Finishers Have Switched
No-Coat corner bead represents a genuine advancement over both traditional metal and vinyl bead in finishing performance, and a growing number of professional drywall finishers in Western Massachusetts have adopted it as their primary outside corner product. The system uses a hard plastic nose for impact resistance with paper flanges that embed in joint compound the same way paper joint tape does, creating a mechanical bond between the bead and the compound that is stronger than the adhesion between compound and a perforated metal flange.
The practical advantage of No-Coat bead over metal bead is visible in the finishing stage. The paper flanges of No-Coat bead key into the first coat of compound in the same way that flat tape embeds into a taped seam, creating a surface that the subsequent coats adhere to with exceptional consistency. The result is a corner that requires fewer fill coats to bring to paint-ready condition and produces a surface that is less prone to compound cracking at the flange edge over time. For finishers who coat corners frequently, the speed and consistency advantage of No-Coat over traditional metal is genuine and measurable.
No-Coat Flexible Corner Tape: The Answer for Non-90-Degree Outside Corners
Standard rigid corner bead, whether metal, vinyl, or No-Coat, is designed for 90-degree outside corners. When a corner deviates from 90 degrees, as it does at bay window exterior angles, cathedral ceiling ridge intersections, angled architectural features, and some contemporary open-plan configurations, rigid bead cannot be installed cleanly without visible kinks or gaps at the nose. No-Coat flexible corner tape is the product designed specifically for these situations.
The flexible spine of the tape allows it to conform smoothly to whatever angle the corner presents. It installs with compound applied to both the substrate and the tape flanges, embedded into the wet compound like flat joint tape, and finished with the same multi-coat process used for any other corner product. The result is a clean, consistent corner profile at any angle, with a paper flange surface that provides excellent adhesion for subsequent coats.
MrWalls tip for non-standard corner angles: before ordering flexible corner tape, determine whether the angle is consistent along the full length of the corner or whether it changes at any point. A corner that transitions from an obtuse angle to 90 degrees requires both flexible tape for the angled section and rigid bead for the 90-degree section, with a careful transition between the two. Getting this wrong produces a visible inconsistency in the corner profile at the transition point that is very difficult to correct after painting.
Bullnose Corner Bead and Rounded Drywall Corners
Bullnose corner bead produces a rounded outside corner profile, with the nose of the bead formed into a smooth radius rather than the sharp 90-degree point of standard bead. Rounded drywall corners were a dominant residential design choice through the 1990s and 2000s and remain a deliberate aesthetic selection in some current construction, particularly in Southwestern and Mediterranean-influenced designs and in some contemporary residential styles that favor softer lines.
Bullnose bead is available in metal, vinyl, and composite construction and in several radius options, with quarter-inch and three-quarter-inch radius being the most common. The installation and finishing process is essentially identical to standard bead installation. The critical rule for bullnose is consistency: every outside corner in the same room and ideally the same home should use the same radius bullnose profile. Mixing a quarter-inch radius in one room with a three-quarter-inch radius in an adjacent room, or mixing bullnose with standard sharp corners in the same space, produces a visually inconsistent result that looks like an error rather than a design choice.
If you are adding rooms or repairing corners in a home with existing bullnose corners, matching the existing radius is essential. Bring a piece of the existing bead or a photograph of the corner profile to the supply house when ordering new material. Quarter-inch and three-quarter-inch bullnose look similar at a glance but produce a visibly different finished profile that will be noticeable when the two are adjacent after painting.
How to Attach Corner Bead: Screws, Crimpers, and Adhesive
Corner bead can be attached by three methods: mechanical fasteners including screws or staples, crimping with a corner crimper tool, or adhesive. Each method has appropriate applications and genuine tradeoffs.
Screws for Corner Bead
Drywall screws driven through the perforated flanges of metal corner bead are the most positive mechanical attachment method and the one MrWalls uses on most standard 90-degree corner applications. Screws are driven every 9 to 12 inches along each flange, alternating between flanges so the fasteners do not align directly across the corner. This staggered pattern reduces the tendency for the bead to rock on the corner under compound shrinkage stress. The screw heads must be set flush with the flange surface or slightly below it. A proud screw head creates a bump that interferes with smooth compound application and shows through finished coats.
Drywall Corner Bead Glue and Adhesive
Adhesive installation has become the preferred attachment method for No-Coat bead and is also suitable for vinyl corner bead in many applications. The adhesive approach eliminates fastener-related bumps on the flange surface, produces a cleaner and more consistent compound application, and is significantly faster than screwing or crimping on a production installation.
The most widely used corner bead adhesive in the professional drywall market is 3M Drywall Corner Bead Adhesive, a spray adhesive applied to the back of the bead flanges before pressing the bead onto the corner. It provides immediate tack for positioning and develops sufficient bond strength within a few minutes to allow compound application without disturbing the bead position. On No-Coat bead with paper flanges, the compound itself provides the primary bond and the adhesive holds the bead in position during the first compound coat.
On 3M Drywall Corner Bead Adhesive: apply the spray to both flanges from approximately 8 inches away, let it become slightly tacky for 15 to 30 seconds before pressing the bead onto the corner, and hold firm pressure for a few seconds after placement. Check that the nose is straight along its full length before the adhesive sets. The working window for repositioning is short, so have your alignment verified before you press. MrWalls uses adhesive installation on No-Coat bead throughout the Pioneer Valley and finds it significantly faster and more consistent than screw installation for that product type.
Crimping Metal Corner Bead
A corner crimper tool, which looks like a modified pair of pliers with jaws shaped to straddle a corner bead flange, punches the metal flange into the drywall surface with a single squeeze. Crimping is fast and eliminates the need for separate fasteners, but it is technique-dependent: uneven crimp spacing or crimps that are not fully seated can allow the bead to shift slightly during compound application, producing subtle waves in the finished corner. MrWalls uses crimping primarily on production new construction where speed is critical and supplements with screws at the top and bottom of each bead length for positive end retention.
Coating Corner Bead: Finishing Drywall Outside Corners
The finishing phase for outside corners follows the same multi-coat process as flat seam finishing, but the technique is specific to the corner geometry. Here is how MrWalls finishes outside corners on every project.
- 1First coat: embed and establish the bed. Apply all-purpose compound or a setting-type compound to both flanges of the installed bead, using the nose as the depth guide for the knife. The knife rides on the nose at one end and feathers the compound away from the corner to a width of approximately four to five inches on each flange. The goal of the first coat is to cover the flanges completely, fill any gaps between the flange and the drywall surface, and establish a flat plane on each side of the corner. Imperfections in the first coat are corrected in the second, not the first.
- 2Allow full dry time before second coat. Do not apply the second coat over a first coat that is not fully dry. Wet compound under a second coat traps moisture and produces compound cracking as the trapped water eventually evaporates. In Western Massachusetts's variable climate, first coat dry time ranges from four hours in dry warm conditions to overnight in humid or cool conditions. The compound should be uniformly white and feel hard, not cool or soft, before the second coat begins.
- 3Second coat: widen and flatten. Apply the second coat with a wider knife, extending the compound to approximately seven or eight inches on each flange. The second coat is applied in two passes per flange: one pass slightly proud of final, and a cleanup pass that removes the excess and leaves a flat, consistent surface. Light sanding between the first and second coat removes any ridges or tool marks that would create visible shadows in the finished surface.
- 4Third coat: final skim and feather. The third coat is a thin skim coat applied with a wide knife, typically a ten-inch or twelve-inch finishing knife, extending the compound to ten inches or more on each flange. The goal is to eliminate any remaining tool marks, ridges, or low spots visible under raking light. Finishing compound rather than all-purpose compound is appropriate for the third coat because it sands more easily and shrinks less than all-purpose.
- 5Sand and inspect under raking light. After the final coat has dried completely, sand with 120-grit sanding screen or paper, using a light hand to avoid scuffing the paper face of the drywall flanges. The critical inspection is done by holding a bright light source at a low angle to the corner surface to reveal any remaining ridges, waves, or compound voids. Any imperfection visible under raking light before primer will be visible after paint. Correct with a thin skim and re-sand before priming.
Comparison: Which Corner Bead Should You Use?
| Bead Type | Best Application | Attachment | Impact Resistance | Moisture Resistance |
|---|---|---|---|---|
| Metal (galvanized) | Standard 90° corners, all rooms | Screws or crimper | Excellent | Good (can rust at cuts) |
| Vinyl | Moisture-prone areas, bathrooms | Screws, staples, or adhesive | Moderate | Excellent |
| No-Coat | All standard corners, production work | Adhesive or staples | Very good | Very good |
| No-Coat Flexible Tape | Non-90° angled corners | Compound embed | Moderate | Good |
| Bullnose | Design choice, all corner types | Screws or adhesive | Good to excellent | Depends on material |
| Flexible vinyl (archway) | Curved corners, archways | Staples or adhesive | Moderate | Excellent |
Why Outside Corner Bead Fails: The Most Common Problems
Outside corner bead problems after painting are one of the most common callbacks in drywall finishing work. Understanding why corners fail helps both contractors and homeowners identify and prevent the most common failure modes.
Cracking compound at the nose of metal bead is typically caused by insufficient compound coats, compound applied too thick in a single coat, or movement in the framing behind the corner that transmits stress to the surface. The fix is removing the cracked compound, applying fresh coats in the correct thickness sequence, and if movement is the cause, confirming the framing is solid before re-coating.
Rust staining through painted corners on metal bead occurs when moisture reaches the cut ends of the bead where galvanizing is absent, or when a holiday in the compound coating allows water vapor to reach the metal surface. The fix requires removing the affected section of bead, treating the exposed metal with a rust-inhibiting primer, and either re-coating or replacing the bead section with vinyl bead for permanent moisture resistance.
Wavy or crooked corners after painting are almost always the result of wavy or crooked bead installation rather than finishing compound errors. The compound follows the bead; if the bead is not straight, no amount of finishing skill corrects the profile. The fix is removing the bead, correcting the framing or shimming as needed, and reinstalling new bead in a straight and plumb position.
What is the best corner bead for drywall outside corners in a standard room?
For standard 90-degree outside corners in living spaces and bedrooms, metal corner bead is the professional default and MrWalls' first choice for most applications. It is rigid, durable under impact, universally available, and produces a very straight and consistent corner profile. No-Coat corner bead is an excellent alternative that many professional finishers prefer for its finishing performance and the strength of its paper-flange bond. In moisture-prone locations including bathrooms, laundry rooms, and basements, vinyl or No-Coat composite bead is the appropriate choice over galvanized metal.
What is the difference between No-Coat corner bead and standard metal corner bead?
No-Coat corner bead uses a hard plastic nose for impact resistance with paper flanges that embed in joint compound the same way paper tape does, creating a mechanical bond rather than relying solely on compound adhesion to a perforated metal flange. The paper flanges key into compound more consistently than metal flanges and produce a surface that requires fewer fill coats to bring to paint-ready condition. No-Coat is installed with adhesive or staples and is somewhat more expensive than metal bead, but many professional finishers find the finishing speed and consistency advantage worth the additional material cost.
Should I use screws or adhesive to attach corner bead?
Both are appropriate depending on the bead type. For traditional metal corner bead, screws through the perforated flanges every 9 to 12 inches provide the most positive mechanical attachment. For No-Coat bead with paper flanges, spray adhesive such as 3M Drywall Corner Bead Adhesive is the preferred attachment method because it holds the bead in position while the paper flanges embed in compound, and it eliminates the fastener bumps on the flanges that can interfere with smooth compound application. For vinyl bead, either screws or staples work well. Crimping with a corner crimper tool is fast and appropriate for metal bead in production installation.
How many coats of compound does a corner bead need?
Outside corners finished with metal or No-Coat bead require a minimum of three coats of compound to reach paint-ready condition: a first coat that embeds and covers the flanges, a second coat that widens the compound footprint and eliminates first-coat imperfections, and a third finishing coat that produces the final flat surface ready for sanding and priming. Some corners with slightly wavy framing or bead installation require a fourth skim coat after sanding to achieve a visually acceptable result under raking light. Attempting to combine these stages into fewer coats by applying compound too thick in a single pass produces cracking as the compound dries.
What is bullnose corner bead and when should I use it?
Bullnose corner bead produces a rounded outside corner profile, with the nose of the bead formed into a smooth radius rather than the sharp 90-degree point of standard bead. It is a design choice rather than a functional one, producing a softer architectural look that suits certain design styles. If you choose bullnose for a project, every outside corner in the space should use the same radius profile for visual consistency. Mixing bullnose with standard sharp corners, or mixing different bullnose radii in the same space, produces an inconsistent result that looks unintentional. MrWalls installs and finishes bullnose corner bead throughout the Pioneer Valley for homeowners who prefer the rounded corner aesthetic.
Can MrWalls repair or replace failed corner bead in my Western Massachusetts home?
Yes. Cracked, rusted, dented, or delaminated corner bead repair and replacement is a regular part of MrWalls' drywall repair work throughout Hampden and Hampshire Counties. We remove the failed bead, assess and address any framing movement or moisture issues that contributed to the failure, install appropriate replacement bead for the specific location, and coat and paint the repaired corner to match the existing wall surface. Call us at (413) 302-0640 or email [email protected] to schedule a free estimate.
Corner Bead Repair and Drywall Finishing in Western Massachusetts
MrWalls installs, repairs, and finishes outside corners throughout Hampden and Hampshire Counties. Serving Springfield, Chicopee, Holyoke, Northampton, and the full Pioneer Valley.
Call or email us today: (413) 302-0640 · [email protected]
Request a Free Estimate ↗