Jason Lebeau from MrWalls Drywall & Painting
Jason has been a drywall contractor for 25 years. He is the owner of MrWalls Drywall & Painting in Chicopee Massachusetts, and still works in the field daily.
Jason has been a drywall contractor for 25 years. He is the owner of MrWalls Drywall & Painting in Chicopee Massachusetts, and still works in the field daily.
Hairline to stair‐step plaster cracks? Learn when to tape, when to skim coat, and how MrWalls restores historic walls in Holyoke and beyond.
Plaster ceilings add character to older homes, but over time, shifting foundations and temperature fluctuations inevitably cause a few blemishes. Before you diving in, evaluate the damage. If the plaster is sagging or pulling away from the lath, it has broken keys, these are the portion of the base coat squeezed through the lath. The plaster requires stabilization and to be re-secured to the lath with glue or plaster washers. If you have large sections pulling away from the lath consider 1/4" drywall over plaster. However, if the plaster is still firmly attached and you are simply dealing with small sections of separation, you can fix it with a few basic tools.
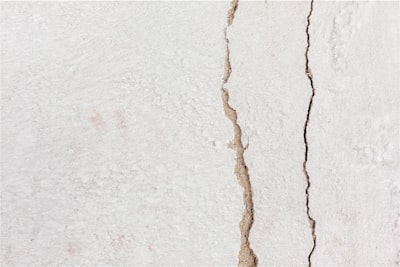
Hairline cracks in plaster ceilings are a common issue that many homeowners encounter. These fine lines can appear seemingly out of nowhere, disrupting the smooth, flawless appearance of a well-maintained ceiling. Understanding the root causes of these cracks is important to properly addressing and prevent them in the future. Hairline cracks are usually narrow, less than a millimeter wide, and often run in irregular patterns across the surface of the plaster. While they might seem insignificant at first, ignoring these cracks can lead to more significant damage over time.
One of the primary causes of hairline cracks in plaster ceilings is the natural movement and settling of a building. As a structure ages, it undergoes subtle shifts and movements due to changes in the ground, temperature fluctuations, and other environmental factors. These movements can put stress on the plaster, causing it to crack. Additionally, the materials used in the construction of older homes can also contribute to the formation of hairline cracks. Plaster, when applied over wooden lath, can be particularly susceptible to cracking as the wood expands and contracts with changes in humidity and temperature.
Another common cause of hairline cracks is poor initial application of the plaster. If the plaster mix is not correctly prepared or if it is applied too thick, it can dry unevenly, leading to cracks. Incorrectly installed or damaged lath can also lead to plaster cracking. Furthermore, vibrations from heavy foot traffic, door slams, or nearby train tracks or construction work can also contribute to the development of hairline cracks over time. Understanding these factors is important to not only fixing the existing cracks but also implementing preventative measures to maintain the integrity of your plaster ceiling in the long run.
For standard, very fine cracks where the plaster remains structurally sound and has a solid connection to the lath, a direct patch is often the quickest solution. Setting-type joint compound (often called "dura-bond") is preferable to pre-mixed drywall mud because it shrinks less and is much stronger, it contains plaster of paris and is close to the density of original plaster.
If a crack returns in the same spot due to minor, ongoing seasonal settling, durabond compound alone won't hold it. You need reinforcement.Using fiberglass mesh drywall tape or paper drywall tape adds the tensile strength required to keep the crack from telegraphing back through your paint job.
| Tape Type | Pros | Cons | Best For |
|---|---|---|---|
| Fiberglass Mesh | Self-adhesive, easy to apply, doesn't trap air bubbles. | Requires setting compound to prevent flexing. Can't use in corners | Quick DIY repairs on stable surfaces. |
| Paper Tape | Stronger joint reinforcement, thinnest profile for invisible blending. | Requires an embedding coat of mud; can ripple if not installed correctly. | High-stress areas and professional-grade finishes. |
| Fibafuse | Thin, strong, tighter weave than mesh. Made of fine fiberglass. Compound goes through it. | When embeding it avoid wipping too hard the sharp edge can rip it. Can't use in corners. | Repairs, seams and butt joints. No Corners |
| Fibafuse Max | Thin, strong, tighter weave than mesh. Made of fine fiberglass. Compound goes through it. Use every. | None, ok for all areas | Best tape for all applications |
To start this repair, apply a thin bedding coat of compound over the crack, press your paper tape firmly into the wet mud, and squeegee out the excess with your knife. Make sure to wipe out all the extra mud from under the tape to avoid leaving a high spot. Once dry, apply two subsequent thin skim coats over the tape, wider to the sides each time, to conceal the slight tape bump completely.
Once the filler is dry, it is time to sand the repaired area to achieve a smooth, even finish. Begin with a medium-grit (120-150 grit) sandpaper to remove any excess filler and then switch to a fine-grit sandpaper (220grit )to blend the repair with the surrounding surface. Take care to sand gently to avoid creating a ramp where your compound meets the surrounding ceiling plaster. After sanding, wipe the area with a damp cloth to remove any dust. The final step is to prime and paint the repaired area to match the rest of the ceiling. It is advisable to use a primer specifically designed for plaster surfaces to ensure proper adhesion of the paint. Once the primer is dry, apply a matching ceiling paint for a flawless finish. This careful, step-by-step approach ensures that hairline cracks are effectively repaired, restoring the pristine appearance of your plaster ceiling.
Fixing hairline cracks in plaster walls follows a similar protocol to ceilings, but walls are subject to different stresses like doors slamming or furniture bumps.
For walls with extensive map-cracking (spiderweb patterns), widening every individual line isn't practical. Instead, embed a specialized fiberglass restoration fabric (fibafuse wall repair fabric) over the entire wall section, skim coat the whole fabric surface, and sand it back to a flat, monolithic finish.
Skim coating plaster cracks should only come after the surface has been secured with mesh fabric(fibafuse) and any loose plaster has been glued back to the lath. After the fabric, we apply thin coats to restore the plane and re-texture. For wallpaper damage,
We first seal the torn paper with specialty primer, then skim smooth.
See our plaster repair Plaster & Skim Coating service,
and finish it right with painting for a seamless
match.
While minor cosmetic blemishes make for a manageable weekend DIY project, historic plaster repair is a specialized trade. Standard drywall contractors often treat plaster like drywall, which can lead to recurring cracks or ruined textures.
If your ceiling is sagging, bouncing when pressed, or dropping large chunks of debris, it is time to call in a specialist. Look for plaster repair professionals who understand traditional three-coat plaster systems, lath stabilization, and lime-based materials to ensure your home's historic integrity remains intact.
Contact MrWalls Drywall & Painting: Get a quote• (413) 302‐0640