
Ice Dam Water Damage Solutions: Prevention & Restoration Guide
Protect your home from water damage from winter ice dams with effective solutions. Learn emergency steps, prevention tips, and the importance of water restoration.
CEILING WATER DAMAGE
Jason Lebeau MrWalls Drywall & Painting
3/3/20268 min read
Water Damage from Winter Ice Dams
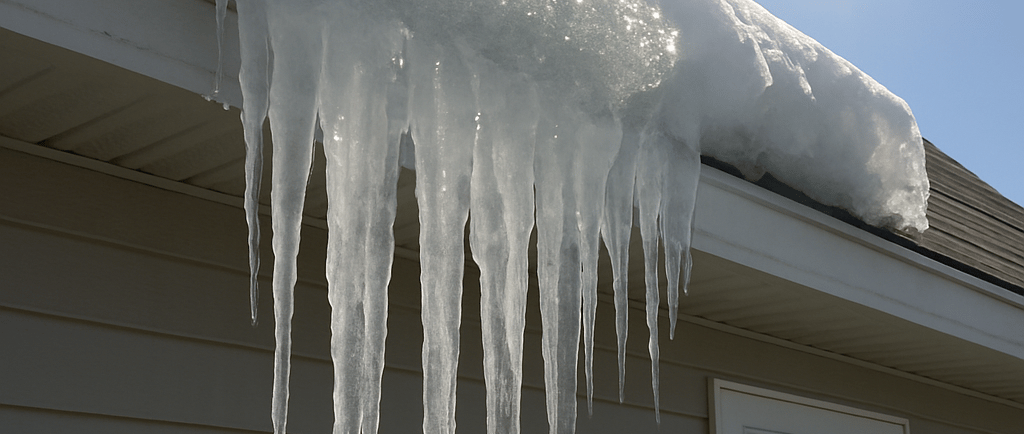
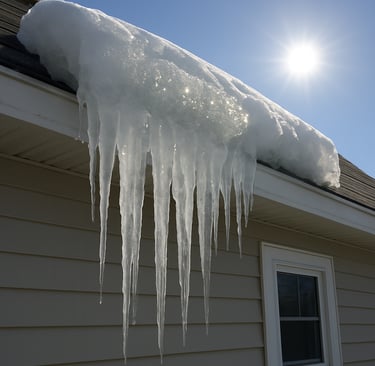
Those beautiful icicles hanging from your roof could be a sign of an expensive problem. If you've noticed new ceiling stains from a roof leak after a heavy snow, the culprit isn't just the ice you can see—it's the wall of frozen water trapped behind it. This common but destructive winter issue, known as an ice dam, is a primary cause of water damage for homeowners in cold climates.
This ridge of ice acts like a literal dam for water on your roof. Just as a dam in a river blocks flow, an ice dam stops melting snow from draining properly into your gutters. With nowhere else to go, this trapped water is forced backward and up, seeping under your shingles. The result is often an ice dam leaking into the house, where it can soak insulation, rot wood, and ruin drywall.
Dealing with active leaks and preventing future damage can feel overwhelming, but a clear path forward exists. This guide outlines the immediate steps to stop the water and covers the long-term solutions to keep your home safe and dry for many winters to come.
What Causes Ice Dams? The Hidden Problem in Your Attic
While it’s easy to blame winter weather for ice dams, the true cause is often hiding right above your head: in your attic. The problem isn't the snow itself but a warm roof underneath it. When heat from your living space escapes into a poorly insulated or ventilated attic, it warms the entire roof deck. This heat escape is the crucial first step in creating a destructive ice dam and is key to knowing how to prevent ice dams on a roof.
This imbalance between a warm roof and a cold edge creates a destructive cycle that happens in four simple steps:
Heat escapes into your attic, warming the underside of your roof and melting the layer of snow sitting on it from the bottom up.
The resulting meltwater runs down your roof, underneath the blanket of snow.
When the water reaches the cold, unheated edge of your roof (the overhangs and gutters), it refreezes into a small ridge of ice.
This process repeats, causing the ridge to grow into a thick dam that traps a growing pool of water behind it.
Ultimately, the best strategy involves preventing ice dams with proper insulation and attic ventilation to stop ice dams from ever starting this cycle. But once the dam has formed, that trapped water can cause serious problems.
What Does Ice Dam Damage Look Like? Key Signs Inside and Out
The first warning sign of an ice dam you'll likely spot isn't on the roof, but inside your home. Water trapped by the dam works its way under your shingles and eventually finds a path downward, often appearing as discolored, brownish ceiling stains from a roof leak along the seam where the ceiling meets an exterior wall. You might also notice peeling paint or damp, sagging drywall. These stains are direct evidence that the dam has breached your home's defenses, and what you see is often just the tip of the iceberg.
Behind that stained drywall, a more serious problem is developing. The water soaks your attic insulation, matting it down and destroying its ability to keep your house warm—imagine trying to stay warm with a soaking wet blanket. This saturated insulation can take months to dry on its own, creating the perfect environment for a hidden threat. In these damp, dark conditions, significant mold growth after a roof leak can begin in as little as 24 to 48 hours, posing a risk to both your home’s structure and your health.
Outside, the sheer weight of the ice itself reveals what ice dam damage looks like. Look for gutters that are bent, pulling away from the house, or filled completely with solid ice. You may even see large icicles forming behind the gutter, a sure sign that water is overflowing the dam and freezing on its way down your siding. These exterior clues are more than just cosmetic issues; they are clear signs of structural damage from ice buildup and a signal that the problem requires immediate attention.
Water Is Leaking In! 3 Emergency Steps to Take Right Now
Seeing water drip from your ceiling can be alarming, but you must act quickly and safely to stop the source. If an ice dam is leaking into your house, your immediate goal is to stop more water from melting. You can often do this from the ground with a tool called a roof rake. This long-handled rake is designed to pull snow off your roof. By clearing the snow from the few feet above the ice dam, you remove the "fuel" that melts into water. No more snow means no more melting, which can slow or even stop the leak until a permanent fix is possible.
However, many common-sense solutions can cause major damage or put you in danger.
What NOT To Do
DO NOT use salt or calcium chloride. It can be highly corrosive, damaging your shingles, gutters, metal flashing, and the plants below.
DO NOT try to chip or chisel the ice away. It’s nearly impossible to break up a solid ice dam without damaging the shingles underneath with your axe or hammer.
DO NOT get on a ladder or the roof. Icy ladders and roofs are incredibly dangerous and are a primary cause of serious winter injuries.
If the leak is severe, you can't safely reach the area with a roof rake, or the ice is too thick, it’s time to call a professional. Companies that specialize in how to safely remove an ice dam use low-pressure steam, which melts the ice quickly and precisely without damaging your roof. Professional ice dam removal cost typically ranges from $400 - $1,000+, but it’s a small price compared to extensive water restoration and mold remediation. While they handle the roof, you may also want to contact a local water extraction service to begin drying out wet carpets, insulation, and drywall to prevent mold.
The Permanent Fix, Part 1: How Insulation Creates a 'Cold Roof'
While clearing snow provides temporary relief, the only way to permanently stop ice dams is to keep your roof cold. The most important tool for this job is the insulation on your attic floor. Think of it as a thick blanket separating your warm living area from the unheated attic. Its job is to hold your expensive heat inside your home, preventing it from reaching the underside of your roof and melting snow. This strategy of preventing ice dams with proper insulation is the foundation of a winter-proof home.
To know if your insulation is doing its job, you need to understand its "R-value"—a rating for how well it resists heat. The higher the R-value, the better it works. In most climates where ice dams are a problem, experts recommend an R-value of R-49 to R-60 for attics. For most common types of insulation, this translates to a depth of roughly 16 to 20 inches. A well-insulated attic floor is crucial because any ice dam damage repair is far more expensive than adding insulation upfront.
You can often get a good idea of your situation with a quick, safe look. From your attic access hatch, can you see the tops of the wooden joists? If you can, you almost certainly don't have enough insulation. But insulation is only half of the equation; it needs to work with proper attic ventilation to stop ice dams.
The Permanent Fix, Part 2: Why Attic Ventilation is a Team Player
Insulation forms the primary defense, but it isn’t meant to work alone. Even the best blanket can’t stop 100% of heat from escaping. That’s where attic ventilation to stop ice dams comes in. It acts like a quiet breeze through your attic, whisking away any warmth that gets past the insulation. This airflow ensures the underside of your roof stays close to the cold outside temperature, leaving nothing to melt the snow from below.
This system works on a simple "in-low, out-high" principle. Cool, outside air is drawn in through vents located under your roof’s overhang (called soffit vents). As this air moves through the attic, it picks up any stray heat, naturally rises, and then exits through a vent along the peak of the roof (the ridge vent). This continuous circulation is the key to how to prevent ice dams on a roof for good, creating an effective team with your insulation.
Often, you can spot a problem from the ground. Look at the underside of your roof's eaves—the soffits. If these vents are clogged with debris, covered by paint, or blocked from the inside by insulation, your attic can't breathe. Ensuring these vents are clear is a critical step in preventing ice dams with proper insulation and ventilation and can save you from major headaches later.
Are Roof Heating Cables a Solution? The Truth About 'Heat Tape'
Walk through any hardware store in winter and you’ll likely see boxes of roof heating cables, often called "heat tape." The concept is simple: you run a zigzag pattern of these electric cables along your roof's edge and in your gutters. When turned on, they get just warm enough to melt channels through the snow and ice, allowing meltwater a path to drain away. It sounds like a perfect set-it-and-forget-it fix for preventing ice dams.
However, these cables are treating a symptom, not the disease. The "disease" is the heat escaping from your attic that's melting snow across your entire roof. By only melting a small path at the cold edge, you're not stopping that expensive heat loss. You're simply paying twice—once with higher heating bills from a leaky attic, and again on the electricity needed to run the cables all winter.
For this reason, most experts view roof heating cables for ice dams as a temporary band-aid, not a cure. They can be a decent last-resort option for a recurring problem spot while you plan for the real fix: improving your attic’s insulation and ventilation. A permanent solution addresses the root cause, saves you money, and gives you true peace of mind.
Navigating an Insurance Claim for Ice Dam Damage
Discovering a water stain on your ceiling is a sinking feeling, but the good news is that standard homeowner's insurance policies often cover this type of event. Your policy is designed to pay for the resulting water damage—things like ruined drywall, soaked insulation, and warped flooring. It typically does not cover the cost of removing the ice dam itself or the long-term fix of improving your attic insulation.
Before you pick up the phone, your first job is to prevent the problem from getting worse. Place buckets to catch drips and move any vulnerable furniture or electronics. Once you’ve done that, become a detective. Use your phone to take extensive photos and videos of the leak, the stained ceiling or walls, and any damaged belongings. Thorough documentation is your most powerful tool and will make the process of filing an insurance claim for ice dam issues much smoother.
With your evidence gathered, contact your insurance agent to report the damage. They will start the claim and explain the next steps, which usually involves a visit from an adjuster to assess the scope of the ice dam damage repair. They can also recommend certified professionals for water extraction and flood cleanup, a critical step to dry out hidden moisture and prevent a dangerous mold problem.
Your Action Plan: A Checklist to Protect Your Home from Ice Dams
You no longer see a row of icicles as just a winter decoration; you see the story they tell about your home’s health. Here is your action plan to protect your home and gain peace of mind, starting today.
Right Now: If water is getting in, catch drips in a bucket and aim a box fan at any wet spots on ceilings or walls to begin drying.
This Weekend: Use a roof rake to safely clear the first few feet of snow from your roof's edge. Afterward, take a quick look in your attic for signs of moisture or areas with low insulation.
Long-Term: Schedule an energy audit to pinpoint hidden air leaks. Based on the results, get quotes for adding insulation to keep your attic cold all winter.
Your home is a system, and a cold roof is your best defense. Following these steps shifts your focus from the stress of future ice dam damage repair to the confidence of a well-maintained home. Instead of reacting to leaks and needing water restoration, you’re proactively ensuring your house stays safe and dry, letting you enjoy winter for the beautiful season it is.
Home | Services | Contact | Offices | Faq | Service Area | Blog | Appointment | Drywall Finishing | Drywall Taping | Drywall Repair | Plaster Repair | Ceiling Repair | Wall Repair | Drywall Installation | Drywall Hanging | Popcorn Ceiling Repair | Crack Repair | Hole in Ceiling | Hole In Wall | Interior Painting | Knockdown Texture | Water Damage Repair | Drywall Bathroom | Drywall Ceiling | Soundboard | Drywall Patch | Black Mold | Ice Dam Roof Leak | Drywall over Plaster | Wallpaper Removal | Fix a Hole | Skim Coating | Popcorn Removal | Apartment Turnovers | Massachusetts | Western MA | Springfield | Chicopee | Ludlow | Wilbraham | Longmeadow | East Longmeadow | Monson | Palmer | Belchertown | Granby | Amherst | Hadley | Northampton | Easthampton | Westhampton | Holyoke | South Hadley | West Springfield | Hampden | Agawam | Westfield | Southampton | Southwick | Granville | Hatfield | Lenox | Beckett | Lee | Great Barrington | Stockbridge | Huntington | Middlefield | Pelham | Plainfield | Ware | Williamsburg | Worthington | Brimfield | Blanford | Holland | Montgomery | Tolland | Wales | Refund Policy | Privacy Policy | Terms and Conditions


600 East Main St Chicopee, MA, 01020
203 Circuit Ave n39, West Springfield, MA 01089

