
Installing Drywall Over Plaster Ceilings | MrWalls Technique
Installing Drywall Over Plaster | MrWalls Technique to permanently repair old ceilings and walls
DRYWALL INSTALLATIONPLASTER REPAIRSHEETROCK
Jason Lebeau MrWalls Drywall & Painting
3/5/20268 min read

Installing Drywall Over Plaster Ceilings | MrWalls Technique
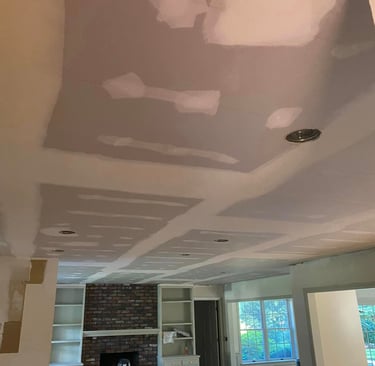
We resurface your old failing plaster. By installing drywall over plaster. MrWalls provides a permanent repair solution for older homes. Discover the benefits of smooth drywall walls and ceilings that never crack.
Understanding Plaster Ceilings
Plaster ceilings have been a staple in homes for centuries, appreciated for their durability and aesthetic appeal. These ceilings were traditionally crafted by applying layers of plaster over lath, a process that required skill and patience. The result was a smooth, hard surface that could withstand the test of time. However, as homes age, plaster ceilings can start to show signs of wear and tear. Cracks, sagging, and flaking are common issues that arise, often necessitating repairs or replacements.
Over time, the lath behind the plaster can weaken, causing the plaster to detach and crack. This structural degradation is often exacerbated by fluctuations in temperature and humidity, which cause the materials to expand and contract. Additionally, homes that have settled over the years may experience shifts that further stress plaster ceilings. While patching can offer a temporary fix, it often doesn’t address the underlying issues, leading to recurring problems.
Given these challenges, many homeowners are turning to drywall as a more reliable and long-lasting solution. Drywall offers a smoother finish and is less prone to cracking and other issues that plague plaster. Installing drywall over existing plaster ceilings is a method that provides a permanent repair, ensuring a seamless, durable surface. This technique not only enhances the aesthetic appeal of a room but also increases the structural integrity of the ceiling.
Benefits of Installing Drywall Over Plaster
One of the primary benefits of installing drywall over plaster is the durability it offers. Unlike plaster, which can crack and crumble over time, drywall provides a stable, smooth surface that is less susceptible to damage. This makes it an ideal choice for homes where the plaster ceilings have begun to show signs of age. By opting for drywall, homeowners can enjoy a ceiling that remains intact and aesthetically pleasing for years to come.
Another significant advantage is the ease of installation. While plastering is a labor-intensive process that requires a high level of skill, installing drywall is relatively straightforward. This makes it a more accessible option for DIY enthusiasts and professionals alike. The process involves fewer steps and less specialized equipment, which can result in time and cost savings. Additionally, drywall can be installed quickly, minimizing the disruption to daily life during renovations.
Aesthetic appeal is another compelling reason to choose drywall over plaster. Drywall provides a smooth, even surface that is ideal for painting or applying other finishes. This allows for greater flexibility in interior design, as homeowners can easily update the look of a room with a fresh coat of paint. Furthermore, drywall can be easily repaired if damaged, ensuring that the ceiling maintains its pristine appearance over time. This combination of durability, ease of installation, and aesthetic versatility makes drywall an excellent choice for upgrading plaster ceilings.
Tools and Materials Needed for the Project
Before embarking on the project of installing drywall over plaster ceilings, it's essential to gather the necessary tools and materials. Having everything on hand will streamline the process and ensure that the installation goes smoothly. The key tools you'll need include a utility knife, drywall saw, T-square, tape measure, and a cordless drill. These tools are fundamental for cutting, measuring, and securing the drywall sheets in place.
In addition to the basic tools, you'll also require specific materials to complete the project. Drywall sheets are, of course, the primary material. It's important to choose the right thickness for your needs; typically, 1/2-inch thick sheets are suitable for ceilings. You'll also need drywall screws to secure the sheets to the ceiling joists. A drywall lift can be incredibly helpful for positioning the drywall sheets, especially when working alone or in a small team.
Taping and mudding materials are also crucial for achieving a seamless finish. Joint tape and joint compound (also known as mud) are used to cover the seams between drywall sheets and create a smooth surface. Sanding tools, such as a sanding block or a pole sander, are necessary for smoothing out the joint compound once it has dried. Lastly, you'll need primer and paint to complete the ceiling's transformation. These finishing touches will help to ensure a professional and polished appearance.
Step-by-Step Guide to Preparing the Ceiling
Preparation is key to ensuring a successful drywall installation over a plaster ceiling. The first step is to thoroughly inspect the existing ceiling for any loose or damaged plaster. Any areas that are crumbling or sagging should be removed and patched to create a stable surface. This may involve scraping away loose material and applying a bonding agent or patching compound to fill in gaps and cracks. Ensuring that the ceiling is as level as possible will make the drywall installation process much smoother.
Once the ceiling has been inspected and any necessary repairs have been made, the next step is to locate and mark the ceiling joists. These structural elements are crucial for securing the drywall sheets in place. Using a stud finder, locate the joists and mark their positions with a pencil or chalk line. This will serve as a guide when attaching the drywall sheets, ensuring that they are securely anchored to the ceiling. It's important to double-check these measurements to avoid any mistakes during installation.
Before proceeding with the drywall installation, it's also essential to clear the room of any furniture or items that could obstruct the work area. Cover the floors and any remaining fixtures with drop cloths or plastic sheeting to protect them from dust and debris. Proper ventilation is also important, so consider opening windows or using fans to keep the air circulating. With the room prepared and all necessary tools and materials on hand, you're ready to begin the installation process.
MrWalls Technique: Detailed Installation Process
The MrWalls technique for installing drywall over plaster ceilings is designed to provide a permanent and seamless finish. The first step in this process is to measure and cut the drywall sheets to fit the dimensions of the ceiling. Using a T-square and utility knife, score the drywall along the marked lines and snap it to create clean edges. It's important to measure accurately to ensure a precise fit, reducing the need for adjustments once the drywall is in place.
With the drywall sheets cut to size, the next step is to position them against the ceiling. Using a drywall lift can make this task much easier, especially when working with large sheets. Align the edges of the drywall with the marked positions of the ceiling joists, ensuring that the sheets are level and flush with one another. Once in position, secure the drywall to the ceiling joists using drywall screws. It's recommended to place screws every 12 inches along the joists to ensure a firm hold.
After all the drywall sheets have been installed, the next step is to tape and mud the seams. Apply joint tape along the seams where the drywall sheets meet, pressing it firmly into place. Using a drywall knife, spread a thin layer of joint compound over the tape, feathering the edges to create a smooth transition between the sheets. Allow the compound to dry completely before applying additional coats. Typically, two to three coats are needed to achieve a seamless finish. Once the final coat has dried, sand the surface to remove any imperfections and prepare it for painting.
Common Challenges and How to Overcome Them
Installing drywall over plaster ceilings can present several challenges, but with the right approach, these can be effectively managed. One common issue is dealing with uneven or sagging plaster. If the plaster is significantly uneven, it may be necessary to shim the ceiling joists to create a level surface for the drywall. This involves attaching thin strips of wood or other material to the joists, providing a consistent base for the drywall sheets.
Another challenge is ensuring that the drywall sheets are securely anchored to the ceiling. If the existing plaster is weak or deteriorating, it may not provide a stable surface for the screws. In such cases, it's crucial to ensure that the screws penetrate through the plaster and into the ceiling joists. Using longer screws can help achieve this, providing a more secure hold. Additionally, using adhesive in conjunction with screws can offer extra support, reducing the risk of the drywall sagging over time.
Dust and debris can also be a significant concern during the installation process. To minimize the mess, it's important to take steps to contain the dust. Covering the floors and any remaining furniture with drop cloths or plastic sheeting can help protect them from debris. Using a vacuum with a HEPA filter can also be effective in collecting dust as you work. Wearing a dust mask and safety goggles is recommended to protect yourself from inhaling particles and potential eye irritation.
Finishing Touches: Taping and Mudding
The taping and mudding process is crucial for achieving a seamless, professional finish on your drywall ceiling. Begin by applying joint tape to all the seams where the drywall sheets meet. Press the tape firmly into place to ensure it adheres properly. Using a drywall knife, apply a thin layer of joint compound over the tape, spreading it evenly and feathering the edges. This first coat should be as smooth as possible to minimize sanding later on.
Once the first coat of joint compound has dried, lightly sand the surface to remove any high spots or rough edges. Apply a second coat of compound, extending it slightly beyond the edges of the first coat to create a smooth transition. Feather the edges carefully to blend the compound with the surrounding drywall. Allow this coat to dry completely before applying a third coat if necessary. Each subsequent coat should be thinner and extend slightly further out to ensure a seamless finish.
After the final coat of joint compound has dried, sand the entire surface to achieve a smooth, even finish. Use a sanding block or pole sander with fine-grit sandpaper for the best results. Be sure to wear a dust mask and goggles to protect yourself from dust. Once the surface is smooth, wipe it down with a damp cloth to remove any remaining dust. At this point, the ceiling is ready for priming and painting, ensuring a polished and professional appearance.
Maintenance Tips for Drywall Ceilings
Maintaining your newly installed drywall ceiling is essential for keeping it in pristine condition. One of the most important aspects of maintenance is regular cleaning. Dust and dirt can accumulate on the surface over time, dulling its appearance. To clean your drywall ceiling, use a soft broom or a microfiber cloth to gently remove dust. For more stubborn dirt or stains, a damp sponge with mild detergent can be used. Avoid using harsh chemicals or excessive water, as these can damage the drywall.
Inspecting your ceiling periodically for any signs of damage is also crucial. Look for cracks, dents, or any areas where the joint compound may be peeling or flaking. Addressing these issues promptly can prevent them from worsening. Small cracks or dents can be easily repaired with a bit of joint compound and a putty knife. For more significant damage, it may be necessary to replace a section of the drywall. Regular inspections and timely repairs will help extend the life of your ceiling.
Humidity and temperature fluctuations can also affect the condition of your drywall ceiling. High humidity levels can cause the drywall to swell and the joint compound to soften, leading to potential damage. Using a dehumidifier can help control humidity levels, especially in areas like bathrooms or basements. Maintaining a consistent temperature throughout the year can also reduce the stress on the drywall, preventing cracks and other issues. By following these maintenance tips, you can ensure that your drywall ceiling remains in excellent condition for years to come.
Conclusion and Final Thoughts on the MrWalls Technique
The MrWalls technique for installing drywall over plaster ceilings offers a durable, aesthetically pleasing solution for aging or damaged plaster. By following the detailed steps outlined in this guide, homeowners can achieve a seamless, professional finish that enhances the overall look and feel of their rooms. The benefits of this technique are numerous, from the durability and ease of installation to the improved aesthetic appeal and long-term maintenance.
One of the most significant advantages of the MrWalls technique is its ability to provide a permanent repair solution. Unlike temporary patches, installing drywall over plaster addresses the underlying issues, ensuring a stable and long-lasting ceiling. This method not only improves the structural integrity of the ceiling but also offers a smooth, even surface that can be easily painted or finished to suit any interior design style.
In conclusion, the MrWalls technique is an effective and efficient way to upgrade plaster ceilings, providing a permanent solution to common issues such as cracks and sagging. By carefully preparing the ceiling, using the right tools and materials, and following the detailed installation process, homeowners can achieve a professional finish that enhances the beauty and functionality of their spaces. With proper maintenance, a drywall ceiling installed using the MrWalls technique will remain in excellent condition for years to come, offering a worthwhile investment in the longevity and appearance of your home.
Home | Services | Contact | Offices | Faq | Service Area | Blog | Appointment | Drywall Finishing | Drywall Taping | Drywall Repair | Plaster Repair | Ceiling Repair | Wall Repair | Drywall Installation | Drywall Hanging | Popcorn Ceiling Repair | Crack Repair | Hole in Ceiling | Hole In Wall | Interior Painting | Knockdown Texture | Water Damage Repair | Drywall Bathroom | Drywall Ceiling | Soundboard | Drywall Patch | Black Mold | Ice Dam Roof Leak | Drywall over Plaster | Wallpaper Removal | Fix a Hole | Skim Coating | Popcorn Removal | Apartment Turnovers | Massachusetts | Western MA | Springfield | Chicopee | Ludlow | Wilbraham | Longmeadow | East Longmeadow | Monson | Palmer | Belchertown | Granby | Amherst | Hadley | Northampton | Easthampton | Westhampton | Holyoke | South Hadley | West Springfield | Hampden | Agawam | Westfield | Southampton | Southwick | Granville | Hatfield | Lenox | Beckett | Lee | Great Barrington | Stockbridge | Huntington | Middlefield | Pelham | Plainfield | Ware | Williamsburg | Worthington | Brimfield | Blanford | Holland | Montgomery | Tolland | Wales | Refund Policy | Privacy Policy | Terms and Conditions


600 East Main St Chicopee, MA, 01020
203 Circuit Ave n39, West Springfield, MA 01089

