
Popcorn Ceiling Removal: How The Pros Do It
Wave farewell to outdated popcorn ceilings! Discover the techniques the pros use for seamless popcorn ceiling removal, transforming your rooms into a modern haven. Let’s dive in!
POPCORN TEXTURESKIM COATING
Understanding Popcorn Ceilings: What Are They?
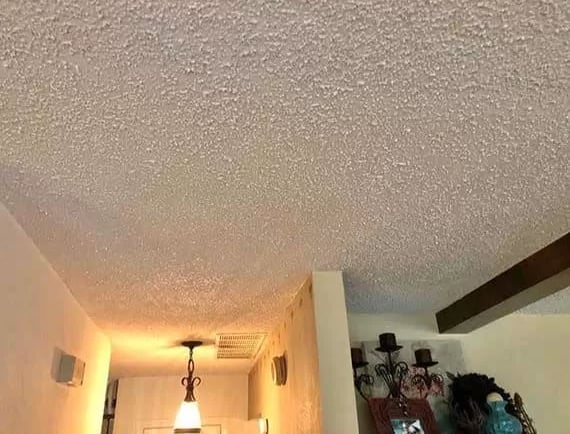
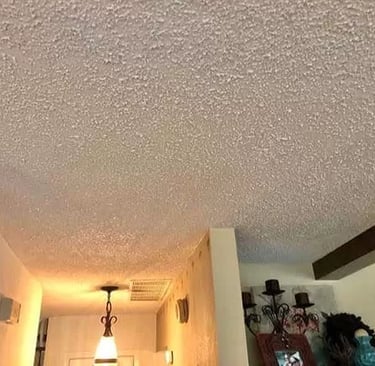
Popcorn ceilings, also known as acoustic ceilings, stucco ceilings, or cottage cheese ceilings, were a popular ceiling treatment from the
1950s through the 1980s. These textured ceilings are characterized by their bumpy, irregular surface that resembles popcorn, hence the name. The texture was typically sprayed on using a hopper gun, creating a finish that was prized for its ability to hide imperfections and absorb sound. This made them particularly popular in bedrooms and hallways, where noise reduction was often desirable.
The texture of popcorn ceilings was achieved using a mixture that included small particles of vermiculite or polystyrene, which gave it that distinctive, lumpy appearance. Initially, the appeal of these ceilings lay in their cost-effectiveness and ease of application. Builders could quickly cover up ceiling imperfections and avoid the need for painting. However, as home design trends evolved, the aesthetic appeal of popcorn ceilings diminished, and they began to be seen as outdated and unattractive.
Another significant drawback of popcorn ceilings is that many of them contain asbestos, a hazardous material that was commonly used in building materials for its fire-resistant properties. Asbestos poses serious health risks when disturbed, making the removal of popcorn ceilings a delicate and potentially dangerous task. Today, homeowners looking to modernize their spaces often choose to remove these textured ceilings, opting for smoother, more contemporary finishes.
Reasons to Remove Popcorn Ceilings
One of the primary reasons homeowners choose to remove popcorn ceilings is to update the look of their home. Popcorn ceilings can make spaces feel dated and unappealing, especially as modern design trends favor clean lines and smooth surfaces. Removing these textures can instantly refresh a room, making it feel more open, bright, and contemporary. This aesthetic upgrade can also increase the resale value of a home, as potential buyers are often turned off by the sight of popcorn ceilings.
Another compelling reason to remove popcorn ceilings is the potential health risk posed by asbestos. As mentioned earlier, many popcorn ceilings installed before the 1980s contain asbestos fibers, which can become airborne if the ceiling is disturbed. Inhalation of asbestos fibers is linked to serious health conditions, including lung cancer, mesothelioma, and asbestosis. For this reason, it is crucial to test the ceiling for asbestos before attempting any removal work. If asbestos is present, professional remediation is necessary to ensure safe removal.
Popcorn ceilings also pose practical challenges. They tend to accumulate dust and cobwebs more easily than smooth ceilings, making them harder to clean and maintain. Additionally, the texture can make it difficult to apply fresh paint or other treatments, leading to an uneven and unattractive finish. By removing popcorn ceilings, homeowners can eliminate these maintenance headaches and enjoy a more hygienic and easily manageable living environment. Overall, the benefits of removing popcorn ceilings far outweigh the drawbacks, making it a worthwhile investment for any homeowner looking to improve their space.
Tools and Materials Needed for Removal
Successfully removing a popcorn ceiling requires a specific set of tools and materials to ensure the job is done efficiently and safely. One of the most essential tools is a sprayer or a garden pump sprayer, which is used to moisten the ceiling texture before scraping. Moistening the texture helps to soften it, making it easier to scrape off without causing excessive dust. A wide putty knife or drywall taping knife is also crucial for scraping the texture off the ceiling. A 6- to 12-inch blade is usually ideal for this task.
Protective gear is vital when removing popcorn ceilings, especially if there is a possibility of asbestos being present. A high-quality respirator mask with a HEPA filter is essential to protect against inhaling dust and fibers. Safety goggles and disposable coveralls will protect your eyes and clothing from debris. Additionally, drop cloths or plastic sheeting should be used to cover floors and furniture, as the removal process can be quite messy. Painter's tape is useful for securing the plastic sheeting to walls and for protecting trim and other fixtures.
Other necessary materials include a ladder or scaffolding to reach the ceiling comfortably, a utility knife for cutting away any stubborn sections of the texture, and sandpaper or a sanding pole for smoothing out the ceiling surface after the texture is removed. A joint compound may be needed to patch any imperfections or holes left behind. Lastly, a primer and paint will be required to finish the ceiling once it has been smoothed and repaired. Having all these tools and materials on hand before starting the project will help ensure a smooth and efficient removal process.
DIY vs. Hiring Professionals: Which is Best?
When it comes to popcorn ceiling removal, homeowners often face the choice between tackling the project themselves or hiring a professional. Each option has its own set of advantages and disadvantages, and the best choice depends on various factors, including budget, time, and the condition of the ceiling. DIY removal can be a cost-effective option for those who are comfortable with home improvement projects. It allows homeowners to save on labor costs and gives them control over the pace and quality of the work. However, DIY removal requires a significant time commitment and can be physically demanding.
On the other hand, hiring professionals for popcorn ceiling removal offers several benefits. Professional contractors have the experience and expertise to handle the job efficiently and safely, especially if asbestos is present. They have access to specialized equipment and techniques that can make the removal process quicker and less messy. Additionally, professionals are well-versed in local regulations and safety standards, ensuring that the project is completed in compliance with all necessary guidelines. While hiring a professional may be more expensive, it can provide peace of mind and save homeowners from potential headaches and hazards.
Ultimately, the decision between DIY and professional removal depends on the specific circumstances of the project. Homeowners with relatively small and straightforward ceilings may find DIY removal manageable and cost-effective. However, those with larger or more complex ceilings, or those who are concerned about asbestos or other hazards, may be better off hiring a professional. It's also worth considering a hybrid approach, where homeowners handle the initial preparation and cleanup, while professionals take care of the actual removal. This can offer a balance between cost savings and professional expertise.
Step-by-Step Guide to Removing Popcorn Ceilings
Removing a popcorn ceiling is a multi-step process that requires careful preparation and execution. Here's a step-by-step guide to help you tackle this project:
Preparation: Start by clearing the room of all furniture and items. Cover the floors with drop cloths or plastic sheeting, and use painter's tape to secure the plastic to the walls. This will protect your floors and make cleanup easier. Turn off the electricity to the room and remove any light fixtures or ceiling fans.
Asbestos Testing: Before you begin, it's crucial to test the ceiling for asbestos if it was installed before the 1980s. You can purchase an asbestos testing kit or hire a professional to take samples. If asbestos is present, do not proceed with DIY removal. Instead, hire a licensed asbestos abatement contractor.
Moistening the Ceiling: Fill a garden sprayer with water and lightly mist a small section of the ceiling. Let it sit for about 15 minutes to allow the water to penetrate and soften the texture. Avoid oversaturating the ceiling, as this can damage the drywall underneath.
Scraping the Texture: Use a wide putty knife or drywall taping knife to gently scrape off the softened texture. Hold the knife at a slight angle to avoid gouging the ceiling. Work in small sections, and continue to mist the ceiling as needed to keep the texture moist.
Sanding and Smoothing: Once the texture is removed, let the ceiling dry completely. Use sandpaper or a sanding pole to smooth out any rough spots or imperfections. Be sure to wear a respirator and goggles to protect yourself from dust.
Patching and Repairing: Inspect the ceiling for any holes or damage. Use a joint compound to patch any imperfections, and sand the patches smooth once they are dry. This step is crucial for achieving a smooth finish.
Priming and Painting: Apply a coat of primer to the ceiling to seal the surface and prepare it for painting. Once the primer is dry, apply your chosen paint color using a roller or paint sprayer. Two coats are usually needed for even coverage.
By following these steps, you can successfully remove a popcorn ceiling and transform your space into a modern, updated room. While the process can be time-consuming, the results are well worth the effort.
Safety Precautions and Best Practices
Safety is paramount when removing popcorn ceilings, especially if there is a possibility of asbestos. Always start by testing the ceiling for asbestos if it was installed before the 1980s. If asbestos is detected, do not attempt to remove the ceiling yourself. Instead, hire a licensed asbestos abatement contractor to handle the removal safely. If no asbestos is present, you can proceed with the project, but take precautions to protect yourself and your home.
Wearing the right protective gear is essential. A high-quality respirator mask with a HEPA filter will protect you from inhaling dust and fibers. Safety goggles will shield your eyes from debris, and disposable coveralls will keep your clothing clean. It's also a good idea to wear gloves to protect your hands from any sharp edges on the putty knife or other tools.
Proper ventilation is crucial during the removal process. Open windows and use fans to help disperse dust and improve air circulation. Consider sealing off the room from the rest of the house using plastic sheeting and painter's tape to prevent dust from spreading to other areas. Regularly misting the ceiling with water will help minimize dust and make the texture easier to scrape off.
Taking breaks during the removal process is important, especially if you're working for extended periods. Removing a popcorn ceiling can be physically demanding, and frequent breaks will help prevent fatigue and reduce the risk of injury. Stay hydrated and take the time to stretch and move around to avoid stiffness and strain. By following these safety precautions and best practices, you can ensure a safe and successful popcorn ceiling removal project.
Dealing with Asbestos in Popcorn Ceilings
Asbestos is a naturally occurring mineral that was widely used in building materials for its fire-resistant and insulating properties. However, it poses serious health risks when its fibers become airborne and are inhaled. Popcorn ceilings installed before the 1980s often contain asbestos, making their removal a potentially hazardous task. If you suspect that your popcorn ceiling contains asbestos, it's crucial to proceed with caution and prioritize safety.
The first step is to have the ceiling tested for asbestos. You can purchase an asbestos testing kit or hire a professional to take samples. If the test comes back positive for asbestos, do not attempt to remove the ceiling yourself. Instead, hire a licensed asbestos abatement contractor who is trained and equipped to handle asbestos safely. These professionals follow strict protocols to prevent asbestos fibers from becoming airborne and to protect themselves and others from exposure.
During the removal process, the abatement contractor will seal off the work area to prevent asbestos fibers from spreading to other parts of the house. They will use specialized equipment, such as HEPA-filtered vacuums and negative air machines, to contain and remove asbestos dust. The contractor will also wear full protective gear, including respirators, coveralls, and gloves, to minimize their exposure to asbestos.
Once the asbestos-containing material is safely removed, the contractor will properly dispose of it according to local regulations. They will also clean and decontaminate the work area to ensure no asbestos fibers remain. Dealing with asbestos in popcorn ceilings requires careful planning and professional expertise, but it is essential for protecting the health and safety of everyone in the home. By hiring a licensed asbestos abatement contractor, you can ensure that the removal process is conducted safely and in compliance with all necessary regulations.
Repairing and Preparing the Ceiling After Removal
After successfully removing the popcorn texture from your ceiling, the next step is to repair and prepare the surface for a new finish. This process involves patching any imperfections, smoothing out the surface, and applying primer and paint to achieve a clean, modern look.
Start by inspecting the ceiling for any holes, cracks, or damage that may have been revealed during the removal process. Use a joint compound to fill in any imperfections, applying it with a putty knife and smoothing it out to create an even surface. Allow the compound to dry completely, and then sand the patched areas with fine-grit sandpaper to blend them seamlessly with the rest of the ceiling. This step is crucial for achieving a smooth finish that will look professional once painted.
Next, it's important to prime the ceiling to seal the surface and prepare it for painting. Choose a high-quality primer that is suitable for drywall or plaster, and apply it evenly using a roller or paint sprayer. The primer will help to cover any remaining stains or discoloration and create a uniform base for the paint. Allow the primer to dry according to the manufacturer's instructions before proceeding to the next step.
Once the primer is dry, you can apply your chosen paint color to the ceiling. Use a roller with an extension pole for even coverage, and consider applying two coats for the best results. A flat or matte finish is often recommended for ceilings, as it helps to hide any remaining imperfections and provides a clean, modern look. By taking the time to properly repair and prepare your ceiling after removing the popcorn texture, you can achieve a beautiful, updated finish that enhances the overall appearance of your home.
Alternatives to Popcorn Ceilings: Modern Options
Once you've decided to remove your popcorn ceiling, it's time to consider the modern alternatives that can give your space a fresh and updated look. There are several options to choose from, each offering its own unique benefits and aesthetic appeal.
One popular alternative is a smooth, flat ceiling. This option involves applying a skim coat of joint compound to the ceiling, smoothing it out, and then sanding it to create a perfectly even surface. A smooth ceiling provides a clean and contemporary look that complements a wide range of interior design styles. It's also easy to paint and maintain, making it a practical choice for many homeowners.
Another option is to add a textured finish to the ceiling, but with a more modern twist than the traditional popcorn texture. Techniques such as knockdown, orange peel, or skip trowel can add subtle texture and visual interest without the heavy, dated look of popcorn ceilings. These textures can be applied using a variety of tools and techniques, allowing you to customize the finish to suit your personal style.
For those looking to add architectural detail and elegance to their space, consider installing decorative ceiling tiles or panels. These can be made from a variety of materials, including tin, wood, or foam, and come in a wide range of patterns and designs. Ceiling tiles can add a touch of sophistication and create a focal point in a room, making them a popular choice for dining rooms, living rooms, and bedrooms.
By exploring these modern alternatives to popcorn ceilings, you can find the perfect solution to update your space and enhance the overall aesthetic of your home. Whether you prefer a smooth, flat finish or a textured, decorative look, there are plenty of options to suit your style and needs.
Conclusion: Final Thoughts on Popcorn Ceiling Removal
Removing popcorn ceilings can be a transformative project that significantly enhances the appearance and value of your home. While the process can be labor-intensive and requires careful planning and execution, the end result is well worth the effort. By understanding the reasons for removing popcorn ceilings, gathering the necessary tools and materials, and following a step-by-step guide, you can achieve a smooth and modern ceiling that elevates your space.
It's important to prioritize safety throughout the removal process, especially if there is a possibility of asbestos. Testing for asbestos and hiring a licensed asbestos abatement contractor if necessary will ensure that the project is conducted safely and in compliance with regulations. Additionally, taking the time to properly repair and prepare the ceiling after removal will result in a professional-looking finish that you can be proud of.
Exploring modern alternatives to popcorn ceilings, such as smooth finishes, subtle textures, and decorative tiles, allows you to customize your space to reflect your personal style. These options offer a range of aesthetic and practical benefits, making them a worthwhile investment for any homeowner looking to update their interior.
In conclusion, popcorn ceiling removal is a valuable home improvement project that can breathe new life into your living space. By following best practices and considering all your options, you can achieve a beautiful and contemporary ceiling that enhances the overall ambiance of your home. Whether you choose to tackle the project yourself or hire professionals, the effort will pay off in the form of a refreshed and modernized space that you can enjoy for years to come.
Home | Services | Contact | Offices | Faq | Service Area | Blog | Appointment | Drywall Finishing | Drywall Taping | Drywall Repair | Plaster Repair | Ceiling Repair | Wall Repair | Drywall Installation | Drywall Hanging | Popcorn Ceiling Repair | Crack Repair | Hole in Ceiling | Hole In Wall | Interior Painting | Knockdown Texture | Water Damage Repair | Drywall Bathroom | Drywall Ceiling | Soundboard | Drywall Patch | Black Mold | Ice Dam Roof Leak | Drywall over Plaster | Wallpaper Removal | Fix a Hole | Skim Coating | Popcorn Removal | Apartment Turnovers | Massachusetts | Western MA | Springfield | Chicopee | Ludlow | Wilbraham | Longmeadow | East Longmeadow | Monson | Palmer | Belchertown | Granby | Amherst | Hadley | Northampton | Easthampton | Westhampton | Holyoke | South Hadley | West Springfield | Hampden | Agawam | Westfield | Southampton | Southwick | Granville | Hatfield | Lenox | Beckett | Lee | Great Barrington | Stockbridge | Huntington | Middlefield | Pelham | Plainfield | Ware | Williamsburg | Worthington | Brimfield | Blanford | Holland | Montgomery | Tolland | Wales | Refund Policy | Privacy Policy | Terms and Conditions


600 East Main St Chicopee, MA, 01020
203 Circuit Ave n39, West Springfield, MA 01089

