
How to Fix Popcorn Ceilings: An Easy Step-by-Step Guide
Update your ceilings with our easy step-by-step guide on fixing popcorn ceilings. Say goodbye to damaged textures and hello to a modern finish!
POPCORN TEXTURECEILING REPAIRCOMMON QUESTIONS

How to Fix Popcorn Ceilings: An Easy Step-by-Step Guide
Popcorn ceilings—the textured relic of the 70s and 80s—are great at hiding imperfections, but they are an absolute nightmare to repair. Whether you’ve had a roof leak that left a brown stain or a stray broom handle took out a chunk of "popcorn," you can’t just paint over the damage and call it a day.
Fixing a textured ceiling requires a delicate touch to ensure the new patch doesn't look like a sore thumb. Here is how to handle the repair without losing your mind.
1. Safety First: The Asbestos Check
Before you scrape, sand, or even touch that texture, you need to know what you’re dealing with. If your home was built before 1980, there is a high probability the texture contains asbestos.
Test it: Buy a DIY test kit or hire a professional to take a sample.
The Rule: If it contains asbestos, do not scrape it. Call a mitigation professional. If it’s clear, proceed to step two.
2. Prep the Zone
Popcorn repair is messy. Gravity is working against you, and those little white crumbs will find their way into every crevice of your home.
Plastic is King: Don't just use drop cloths; use 4-mil plastic sheeting. Tape it to the top of the walls so it creates a "bathtub" on the floor to catch the debris.
Protect Yourself: Wear a mask and goggles. Falling texture in the eye is a localized disaster you want to avoid.
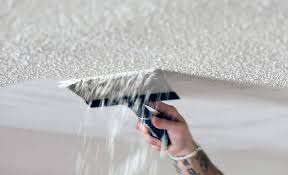
3. Scrape and Square
You can't apply new texture over loose, damaged material.
Dampen the Area: Use a spray bottle with warm water to lightly mist the damaged spot. Let it sit for 5 minutes. This softens the "popcorn" and prevents dust.
The Scrape: Use a 6-inch putty knife to gently scrape away the damaged texture. Aim to clear an area about 2 inches larger than the actual damage to allow for blending.
4. The Patch and Prime
If the drywall underneath is damaged (like from a water leak), you’ll need to apply a thin layer of joint compound and sand it smooth first.
Seal the Stain: If you’re repairing a water stain, you must use a stain-blocking primer (like Kilz or Zinsser). If you don't, the brown tannin from the water will bleed right through your new texture and paint.
5. Re-Texturing
This is the "make or break" moment. You have two main options:
Aerosol Texture: For small spots, a "Popcorn Ceiling Spray" can works wonders. The trick is the "burst" technique—don't hold the trigger down. Spray in short, controlled bursts.
Pre-Mixed Patch: This comes in a small tub and is applied with a sponge or brush. It’s better for very small gouges.
FAQ: Mastering the Overhead Mess
Q1: Why does my new texture look whiter than the rest of the ceiling? Ceilings collect dust, smoke, and cooking oils over years. Your new patch is "pure" white, while the rest is likely "aged" white. Once the patch is dry, you will almost certainly need to paint the entire ceiling to get a perfect match.
Q2: Can I just scrape the whole ceiling instead of patching it? Yes, and many people do! If you have multiple repair spots, it’s often easier to wet the whole ceiling, scrape it smooth, and transition to a modern flat finish.
Q3: How do I get the "chunks" to match the size of my existing texture? Aerosol cans usually have a nozzle that can be adjusted for "fine," "medium," or "heavy" textures. Always test the spray on a piece of cardboard first to calibrate the flow.
Q4: Do I need to prime the texture before painting? Yes. Popcorn texture is essentially dried mud. If you roll paint directly over it without priming, the moisture in the paint can soften the texture and cause it to peel off right onto your roller.
Q5: What if my popcorn ceiling has been painted before? Painted popcorn is much harder to scrape. Water won't soak in easily, so you'll need to use a bit more elbow grease or a chemical stripper. If it's painted, it’s often easier to just skim coat over it or hang 1/4-inch drywall over the top.
Is your repair due to a one-time "dent" or are you dealing with the aftermath of a water leak?
Home | Contact | Offices | Faq | Service Area | Blog | Drywall Finishing | Drywall Taping | Drywall Repair | Plaster Repair | Ceiling Repair | Wall Repair | Drywall Installation | Drywall Hanging | Popcorn Ceiling Repair | Hole in Ceiling | Fix Hole In The Wall | Interior Painting | Knockdown Texture | Water Damage Repair | Drywall Bathroom | Drywall Ceiling | Soundboard | Drywall Patch | Ice Dam Roof Leak | Drywall over Plaster | Drywall Over Popcorn | Skim Coat Level 5 | Popcorn Texture Removal | Drywall Finish Levels | | Refund Policy | Privacy Policy | Terms and Conditions


600 East Main St Chicopee, MA, 01020
203 Circuit Ave n39, West Springfield, MA 01089

