
Fixing Humps on Drywall Ceiling: DIY or Call a Pro?
Discover how to identify and fix humps on drywall ceilings with this comprehensive guide. Learn to differentiate between minor drywall imperfections and serious issues to ensure your home's safety and aesthetics.
COMMON QUESTIONSDRYWALL REPAIRDRYWALL FINISHINGBAD TAPING JOB
Humps on a Drywall Ceiling
Those mysterious bumps in ceiling seams that you notice weren't there last week, and now it's all you can see. While it's natural to worry about major leaks or structural failure, most of these imperfections are minor cosmetic issues. The key is knowing how to tell the difference. A few simple checks are often all it takes to understand what's happening, as the shape, hardness, and location of the hump can reveal whether you're dealing with a simple fix or a symptom of a bigger problem. This guide will help you distinguish between a harmless popped screw, a failing tape seam, and the more urgent signs of moisture, so you can create a confident action plan and feel secure in your home again.
Your 3-Step Ceiling Check-Up: How to Safely Investigate a Drywall Hump
To diagnose the cause, you need to gather a few simple clues. This quick check-up will help pinpoint whether you’re dealing with a minor cosmetic issue or something that needs more attention. Run through this simple three-step process to find the evidence you need.
1. LOOK: Observe the hump’s features. Is it a single, small bump, or a long, straight line? Note its location, is it in the middle of the room, near a wall, or does it seem to follow a seam? The shape and location are your first major clues.
2. TOUCH: If you can reach it safely with a stepladder, gently press on the area. Is the hump rock-hard, or does it feel soft and spongy? A hard bump points to a problem with the structure or fasteners, while a soft spot is a red flag for moisture.
3. DOCUMENT: Pull out your phone and take a clear picture. This creates a valuable record, allowing you to easily see if the hump grows, shrinks, or changes shape over time.
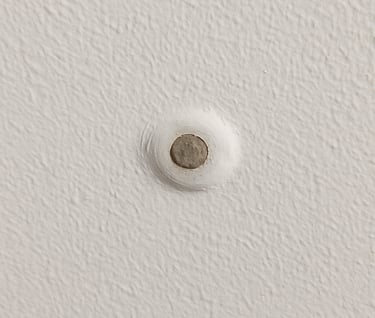
Cause #1: Are They Small, Hard Bumps? Meet the "Nail Pop"
If your investigation revealed a small, hard bump, often perfectly round and about the size of a coin, you can most likely relax. You're looking at a classic "nail pop." This is one of the most common cosmetic issues in any home with drywall and, importantly, it is not a sign of structural danger. The bump is simply the head of a nail or screw that has pushed its way out slightly, creating a tiny tent in the paint and the thin layer of plaster on top of it.
The cause lies behind the ceiling itself. Your drywall is attached to a wooden frame made of beams called ceiling joists. Wood naturally expands and contracts with shifts in temperature and humidity. As this wooden frame moves ever so slightly, it can slowly push a nail or screw outward. The drywall doesn't move with the fastener, and the result is a small but noticeable bulge on the surface. It’s a normal part of a house settling and adjusting to the seasons.
Because a nail pop is just a cosmetic flaw, the fix is straightforward. While it’s more than just painting over it, the repair doesn’t involve any major structural work. However, if the hump you found isn’t a small, isolated bump but looks more like a long, straight ridge or a bubbling line, you’re likely dealing with a different issue.
Cause #2: Is It a Long, Straight Ridge or a Bubbling Line?
When the hump on your ceiling isn’t a small dot but a long, straight line, you’re looking at a different kind of issue. These imperfections often appear as a distinct ridge or a series of bubbles that follow a perfectly straight path. This is a tell-tale sign of failing drywall tape, another common and usually non-critical ceiling problem.
To understand why this happens, picture how your ceiling is built. It’s made of large drywall sheets installed side-by-side. To create a seamless, flat surface, finishers cover the joints between these sheets with a special paper or mesh tape. This tape is held in place and hidden by a mud-like material called joint compound.
Over time, factors like house settling or repeated exposure to humidity (especially in bathrooms or kitchens) can weaken the adhesive bond of the joint compound. When it loses its grip, the tape underneath begins to lift away from the ceiling, creating the bubble or ridge you now see. An imperfect installation years ago can also be the culprit.
The good news is that this is a surface-level problem, not a structural one. The integrity of your ceiling isn't at risk; just the cosmetic finish is. It's a more involved repair than fixing a nail pop, but it is entirely correctable. However, if the hump you've found feels soft, spongy, or has any discoloration, we need to consider a more urgent cause.
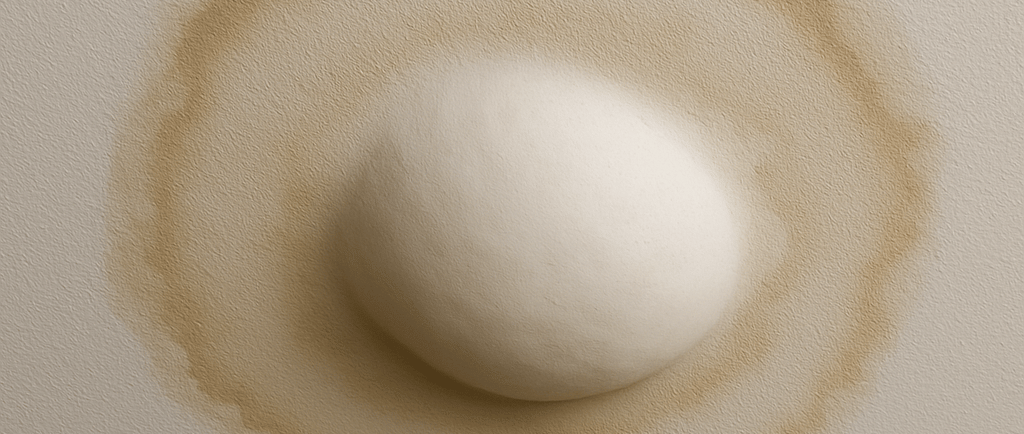
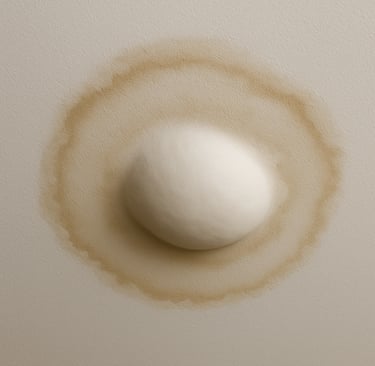
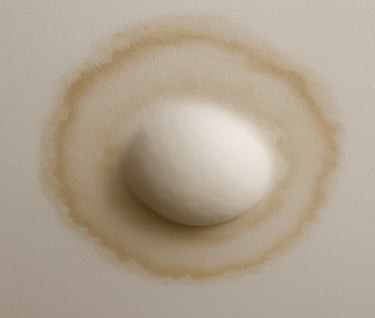
Cause #3: What a Soft, Spongy, or Discolored Hump Means
If your gentle push on the hump revealed a soft, spongy spot, you've found the most urgent cause. Often accompanied by a yellowish or brown stain that looks like a coffee ring, these signs are the calling card of moisture. Drywall acts like a very dense sponge; when it gets wet, it swells, softens, and sags under its own weight. The hump you see is the direct result of water being absorbed into the ceiling material.
With water involved, the bump on your ceiling is no longer the main problem, it’s a symptom. The real issue is the active or recent leak that caused it. Simply patching the hump without stopping the water is like bailing out a boat without plugging the hole; the problem will just come back, likely worse than before. Your number one priority has now shifted from cosmetic repair to finding that source.
Think about what's directly above the damaged area. A hump on the ceiling below an upstairs bathroom often points to a leaky toilet seal, shower drain, or pipe. If the damage is on your top floor, a compromised roof or clogged gutter is a likely suspect. Sometimes, it can even be a slow leak from an appliance in a second-floor laundry room. The location of the hump is your best clue.
Unlike a cosmetic issue, water damage requires immediate attention to prevent mold growth and protect the structural integrity of the wood frame above it. This isn't a "wait and see" problem. Before any drywall repair can be considered, the leak must be found and fixed.
Cause #4: How to Identify Truss Uplift and Dangerous Sagging
While most humps are minor, a large, drooping section of the ceiling is a much more serious signal. If you see a wide, sagging area that looks like a heavy belly hanging down, it’s a red flag. This kind of broad sag, especially if it’s growing, feels soft, or is accompanied by cracking sounds, points to a significant problem, either from a major, long-term leak or a potential structural failure. This is one of the few situations where ceiling bulges are dangerous and demand immediate attention.
However, not all large-scale movement is a sign of disaster. You might notice a long, perfectly straight hump or crack that appears on the top floor, usually near the center of the house, and seems to get worse in the winter. This is likely a common issue called “truss uplift.” Your roof is held up by a framework of wooden beams (trusses), which can bow slightly when there’s a big temperature difference between your warm living space and the cold, dry attic. This movement can pull the ceiling upward, creating a hump.
Distinguishing between these two scenarios is critical for your peace of mind and safety. Use this simple comparison to see which one matches your situation:
Truss Uplift:
Appears or worsens in winter and often lessens in summer.
Looks like a long, straight hump or crack where the ceiling meets an interior wall.
The area feels hard and solid.
Serious Sagging:
Can appear at any time and usually gets progressively worse.
Looks like a wide, broad droop or swollen area in the middle of a ceiling.
May feel soft, spongy, look wet, or be accompanied by cracking noises.
If what you're seeing matches the description of serious sagging, your next step is simple: call a professional immediately. For your safety, this is not a DIY situation. A qualified general contractor or a structural engineer can assess the problem and ensure your home is secure.
A Clear Guide: Can You Fix This Yourself?
Once you've identified the culprit, the next question is whether you can handle the repair yourself. The answer depends on if the problem is cosmetic or a symptom of a deeper issue like water damage or structural stress. Use this checklist to decide on your action plan.
Your Action Plan
If you have... Small, hard nail pops:
Verdict: This is a great DIY project. The process of drywall ceiling nail pops repair involves setting the nail, patching, sanding, and painting, a perfect introduction to repairing ceiling drywall imperfections.
If you have... A long, straight line of failing tape (in a small, dry area):
Verdict: Good for an ambitious DIYer. It requires more patience and a few more steps than a nail pop, but it’s definitely manageable with online tutorials.
If you have... Any water stain, discoloration, or soft spot:
Verdict: Call a PRO first. The drywall repair is the last step. First, a roofer or plumber must find and fix the leak.
If you have... A large, sagging, or cracked area:
Verdict: Call a PRO immediately. This is a safety issue that requires an expert assessment from a contractor or structural engineer.
If the cause of the hump is dry and stable, a DIY repair is often on the table. But if moisture or significant sagging is involved, your first call shouldn't be to a drywall specialist, but to the professional who can solve the root problem.
Who to Call: Matching the Problem to the Right Professional
Knowing you need a professional is one thing; knowing which one to call is another. Match your first call to the source of the damage, not just the symptom, to avoid wasted time and unnecessary fees.
For any hump that feels soft, is discolored, or shows signs of moisture, think about what is directly above it. If the spot is below a bathroom or kitchen, your first call should be to a Plumber. They can track down a hidden pipe or drain leak. If the damage is on the top floor and gets worse after it rains, start with a Roofer.
Once the source of any leak is completely fixed and the area has dried out, then it’s time to address the cosmetic damage. A skilled Handyman or a dedicated Drywall Contractor is your best bet. These pros specialize in smoothing a bumpy ceiling, making repairs disappear completely. They have the experience and the best tools for drywall ceiling repair to avoid an uneven drywall ceiling finish.
Calling a drywall expert before fixing the leak is like painting over rust—it only hides the problem temporarily. The plumber or roofer stops the cause, and the handyman or drywall contractor erases the evidence, leaving you with a perfect ceiling once more.
From Worry to Action: Your Plan for a Smooth, Safe Ceiling
The mysterious bump on your ceiling is no longer an unknown source of anxiety. By reading its shape, texture, and location, you can now distinguish between a simple cosmetic flaw, like a nail pop, and an urgent signal of moisture. Most humps on a drywall ceiling are minor, and knowing the difference empowers you to decide on the right repair. Whether it's a small DIY fix or a call to the right professional, you have a clear path to restoring your smooth, safe ceiling

Home | Contact | Offices | Faq | Service Area | Blog | Drywall Finishing | Drywall Taping | Drywall Repair | Plaster Repair | Ceiling Repair | Wall Repair | Drywall Installation | Drywall Hanging | Popcorn Ceiling Repair | Hole in Ceiling | Fix Hole In The Wall | Interior Painting | Knockdown Texture | Water Damage Repair | Drywall Bathroom | Drywall Ceiling | Soundboard | Drywall Patch | Ice Dam Roof Leak | Drywall over Plaster | Drywall Over Popcorn | Skim Coat Level 5 | Popcorn Texture Removal | Drywall Finish Levels | | Refund Policy | Privacy Policy | Terms and Conditions


600 East Main St Chicopee, MA, 01020
203 Circuit Ave n39, West Springfield, MA 01089

